Following is a step-by-step guide that you can follow and have your video processing library up and running on Windows OS in about 20 minutes.
Pre-Requirements
- A Windows 11 running computer.
- Archiver for files (This guide uses 7-Zip).
- Accessibility to Windows PowerShell or the Command Prompt.
- Administrative Rights.
Install FFmpeg on Windows 10/11
Step 1: Download the FFmpeg package
-
Visit the official website to get the latest version of the FFmpeg package and binary files.
Tap the window icon as shown below and click the Windows builds from gyan.dev file. This redirects you to a page having FFmpeg binaries made especially for Windows, which come with all the hardware libraries you could want.

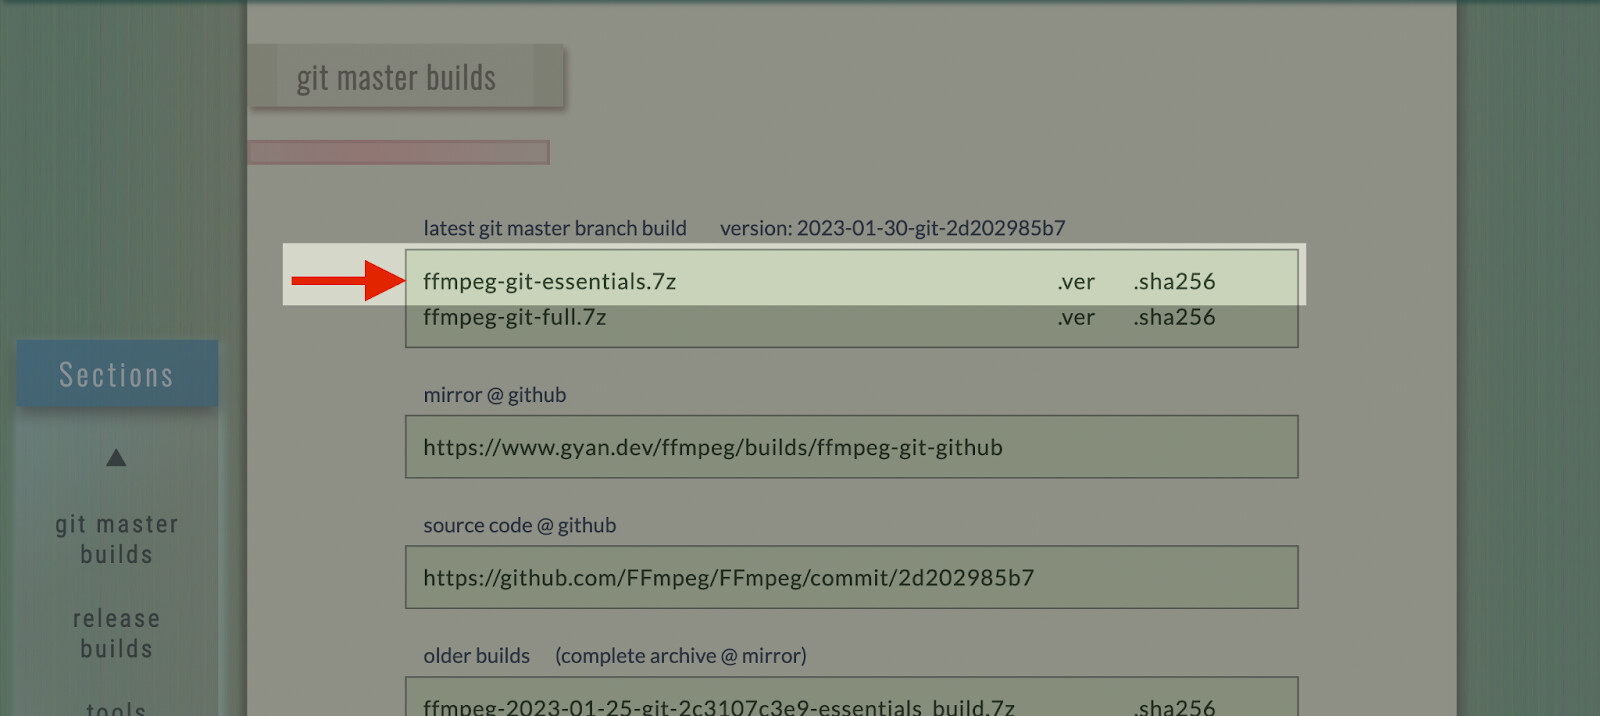
- Scroll down and you will find the git master builds, download the first one. This link will download the latest version of FFmpeg files to your computer in a compressed format.
Step 2: Unzip the downloaded files
- First, you must download a program that can decompress folders with the .7z file extensions, such as WinRAR or 7Zip, to proceed.
- Right-click the
Start/Windowsbutton and select File Explorer. - On the left side, select the Downloads folder.
- Right-click the
ffmpeg-*-git-*full build.7zfile (the file name will vary depending on the current release). - Wait for the files to extract after selecting
Extract Here. With this, a brand-new folder with the exact name as the.7z file is created. - Now, rename the extracted folder.
Step 3: Add the PATH environment variable
-
To start FFmpeg from the command line, add the FFmpeg directory to your PATH environment variable. There is no need to type the complete path to FFmpeg to perform FFmpeg instructions at the command prompt. Follow:
-
Click the Start option, search for
Environment Variables, and then click Edit the system environment variables. -
Select the Environment Variables button.
-
Go to the System Variables, find the Path variable, then tap Edit.
-
Select New and add the path to the ffmpeg bin directory, e.g.,
C:\ffmpeg\bin. -
Restart any command prompt windows or open a new one for the changes to take effect.
Step: 4 Verify the PATH
-
To open the terminal:
- Find
command promptorcmdin the start menu. - When the Run utility is open, press Win+R and Shift+Right to enter cmd.
- Find
-
Verify whether it’s working, and run
ffmpeg -versionin the command prompt.
Note: The steps would be the same to download the FFmpeg on Windows 7, - 64 bit, Windows Vista (Windows Vista, an outdated operating system, is no longer supported by Microsoft). It is recommended that you set up Windows 11(the latest version).
Install FFmpeg for python on Windows
You can install FFmpeg for Python on Windows OS by following these steps:
Install the Python bindings for FFmpeg using pip
-
To download the FFmpeg using python, run the following command in your command prompt:
pip install ffmpeg-python
This command will download the latest version of FFmpeg to your computer. -
Create a file called “test.py” and paste the below-given code into it. Run a Python script that makes use of FFmpeg to confirm the installation.
import ffmpeg
print(ffmpeg.get_ffmpeg_version()) -
Run the file using the command mentioned, and if it shows the output, FFmpeg is installed successfully.
python test.py -
Now, repeat the steps listed above to download FFmpeg on Windows.
How to run FFmpeg commands from a Python Script?
Now that you have installed FFmpeg on Windows for Python, you’d want to know how to execute Python commands from the terminal.
To accomplish this, Subprocess Management is required.
-
The first step is to import the subprocess module, which enables the user to execute the commands from Python.
-
Create a variable to represent the exact location of the ffmpeg binary on your PC.
import subprocess
ffmpeg = "/usr/local/bin/ffmpeg” -
Let’s take an example of how to convert an input video to an MP4 format using python script:
import subprocess
// Define the FFmpeg command
command = “ffmpeg -i input.mp4 output.mp4”
// Run the FFmpeg command using subprocess.run()
result = subprocess.run(command, shell=True, stdout=subprocess.PIPE,stderr=subprocess.PIPE)
// Check the return code to determine if the command was successful
if result.returncode == 0:
print(“Video conversion is done successfully.”)
else:
print(f"Video conversion is failed with error code {result.returncode}.“)
print(f"FFmpeg error message: {result.stderr.decode()}”)
You have successfully installed FFmpeg on your system.
This article is all about the procedures and commands you must use to install FFmpeg on Windows, with an example at the end.
For more installation guides visit: